Yet again optimistic, I threw a spoonful of chokecherries into the cone and went to work. The result?
Wednesday, March 13, 2013
Chokecherry Success?
A friend of mine mentioned to me a while back that she had a cone-shaped strainer and pestle. She has graciously allowed me to borrow it to try my hand at it with my chokecherries. She also harvested a bunch of chokecherries this summer/fall but she didn't try the strainer with hers as she was just making jelly. I, on the other hand, would like to make fruit leather, which takes pulp not just the juice.
Friday, March 8, 2013
The Chokecherry Saga Continues
Last week, after quite a bit of research on a good, mechanical way to remove the pits from the pulp, skin, and juice of chokecherries, we thawed out a few bags of chokecherries to attempt to make some chokecherry leather, which we've heard is very good and highly nutritious. I was optimistic as I read that several people simply remove the spring from their Victorio food strainer and it works the chokecherries through just fine. Well, we don't have a Victorio but I thought maybe it would still work to just remove the spring from our Kitchen Aid Fruit and Vegetable Strainer for my stand mixer.
I put a spoon of chokecherries in the hopper and turned it onto the slowest setting. It was going okay but didn't even get any of the juice/pulp to drop into the bowl before I started hearing the pits breaking. Defeated, I turned it off to avoid any permanent damage to my machine and cleaned it all up.
For the next several days, I tried to come up with something else that might work. I have, through that research, discovered that the plains indians just crushed the pits up and dried it with the leather. Apparently, the process of drying (cooking, essentially) removes the potential for cyanide to be present, so then the pits are safe to eat. I still haven't tried this yet as I have another method I'm going to attempt first.
In the process of this research, I found a Crow Indian recipe for chokecherry cake that I decided to try. It calls for just one cup of crushed, pitted chokecherries. I decided to do that by hand, which took about an hour. (Definitely not going to be doing this by hand for all of the gallons upon gallons of chokecherries we have in our freezer!)
Once that was done, it was a quick cake to put together, though I did cook it in a 9 x 13 pan instead of the angel food cake pan it says to use.
I wasn't quite sure how good it would be but I was serving it to some friends of ours anyway! I worried a little about not having any kind of frosting over top, but what I would have done was a mix of Cool Whip and chokecherry syrup only we didn't have any Cool Whip. It went over really well, though, and we had only about 1/3 of the cake left at the end of the night! My husband said I could definitely make it again. Next time I plan to try it with the frosting.
I put a spoon of chokecherries in the hopper and turned it onto the slowest setting. It was going okay but didn't even get any of the juice/pulp to drop into the bowl before I started hearing the pits breaking. Defeated, I turned it off to avoid any permanent damage to my machine and cleaned it all up.
For the next several days, I tried to come up with something else that might work. I have, through that research, discovered that the plains indians just crushed the pits up and dried it with the leather. Apparently, the process of drying (cooking, essentially) removes the potential for cyanide to be present, so then the pits are safe to eat. I still haven't tried this yet as I have another method I'm going to attempt first.
In the process of this research, I found a Crow Indian recipe for chokecherry cake that I decided to try. It calls for just one cup of crushed, pitted chokecherries. I decided to do that by hand, which took about an hour. (Definitely not going to be doing this by hand for all of the gallons upon gallons of chokecherries we have in our freezer!)
Once that was done, it was a quick cake to put together, though I did cook it in a 9 x 13 pan instead of the angel food cake pan it says to use.
I wasn't quite sure how good it would be but I was serving it to some friends of ours anyway! I worried a little about not having any kind of frosting over top, but what I would have done was a mix of Cool Whip and chokecherry syrup only we didn't have any Cool Whip. It went over really well, though, and we had only about 1/3 of the cake left at the end of the night! My husband said I could definitely make it again. Next time I plan to try it with the frosting.
Thursday, March 7, 2013
.....And We're Back!
Wow. We got our household goods in September. Soon after, we had a small flurry of visitors. Then came the holidays and travel to see family in the lower 48. It's amazing how quickly the time flies. There are a lot of things to post about and I plan to make the time here in the next few weeks.
For now, I have to go get the kids up so we can get ready to go play in the Kids' Ice Park and watch some of the sculpting at the World Ice Art Championships. We attended the 2011 championships and had a blast, so we're really looking forward to it again. And today is a beautiful 32° out there.
Wednesday, October 24, 2012
Winemaking 101: Chapter 4
After letting the wine sit and ferment for a month and a half, all the sediment is down at the bottom and the wine is transparent and ready to bottle, though not quite ready to drink.
Look at the beautiful colors! First we moved it over to our primary fermenting bucket, leaving ALL the sediment behind so that we could bottle it upstairs and not have to worry about bottling any of the sediment.
After a few spills/dribbles trying to figure out who to have where and how to switch bottles, we finally got a good rhythm going. We wound up with 12 bottles, 8 of them 1.5 liters because that's what we were able to get easiest free, one 64 oz beer growler (because we ran out of bottles!), and a glass and a half of wine.
| We have classy labels, too! |
Now it is supposed to age for at least 6 months before drinking. So we had to find a cool, dark location. Unfortunately, we are still in the process of unpacking and finishing our basement, so we actually used a padded case that is currently not in use. It'll be easier to move around as necessary, too.
Of course, having a glass and a half that couldn't be bottled, we had to try some. Since, before bottling, we added Campden tablets again, which my husband says is for pasteurization and stopping the yeast from continuing to ferment, it really did not taste very good the night we bottled, though we could taste the wine behind it. We've been keeping it in the refrigerator in the open glass and taste it every day. It just keeps tasting better, so that's a good sign. We're excited about cracking into a bottle in about April.
Saturday, October 20, 2012
The Sourdough Pancake Part X
I have good news!! There are two answers to the question I asked previously about chemistry. Answer one. You can artificially increase the acidity and thus the sour flavor of the pancake. Answer two, you can get a really sour pancake without doing this.
Over the last couple of weeks I've worked my starter on the counter to get it really hot and bothered. I feed it regularly but only when it needs it. I've been watching it's stages as it starts by rising, then it becomes sponge like and then it builds up the "water" which is the sourdough alcohol and byproducts. I can tell you that until you have a good amount of "water" you won't have really sour pancakes.
You might also hear that you should pour off the water before making the pancakes or even bread. This is dead wrong. That water is where the flavor is at. It's your sign of having a hot active sourdough. If it takes too long to get to that stage then you likely don't have a very strong starter yet. Don't worry about that, just give it a few feedings and some sugar (for hyperdrive) and let it rock and roll.
I have now mastered the sour part of the pancake but haven't really gotten to the fluffy. No matter what they aren't going to be as fluffy as buttermilk pancakes but you can get them a lot more fluffy than mine. Today's iteration seemed to be a result of my batter being too thin. I also tried making waffles which was a fail as I used an old iron which wasn't seasoned well and it stuck.
The "secret" ingredient to making cheater sourdough is: Lemon juice
I haven't tried ascorbic acid (pure vitamin C) yet but I'm guessing that would work as well.
This week I may titrate some lemon juice with baking soda to see what will yield a neutral pH. Then I can mix those parts in with an already sour sourdough and that should yield fluffy but still sour pancakes. Hope this works.
Sunday, October 7, 2012
The Pancake Saga Part IX
This has been a busy pancake week. My sister came to visit and we had pancakes at least three times while she's been here. The first time was the most sourdoughy I've made and my wife was a fan. What I tried that made the difference. This time instead of using 1 teaspoon of soda I used 1/4 and I made enough for another adult so the batch size was bigger.
The problem. Less soda=less fluffy. So I'm getting more sour but the fluff is going down. I've also started getting up, adding all of the ingredients, egg and sugar and then placing in a warm spot while I take a shower. This is similar to the concept when making sourdough bread when you add the flour and let it sit for an hour before making the dough and letting it leaven. My thought is that the 30-45 min from adding sugar (high energy) until I cook the cakes should energize the yeast. I'm not sure if it's worked as I haven't repeated the process.
Yesterday, I had the opportunity to take my sister to Sam's Sourdough Cafe and I tried to eek their secret out of the waitress with the resulting comment of "it's complicated". Perhaps if I eat enough pancakes there, they will have sympathy. Then again I think I may have stumbled on the solution but I won't mention it until I've tried it.
Until next time.
The problem. Less soda=less fluffy. So I'm getting more sour but the fluff is going down. I've also started getting up, adding all of the ingredients, egg and sugar and then placing in a warm spot while I take a shower. This is similar to the concept when making sourdough bread when you add the flour and let it sit for an hour before making the dough and letting it leaven. My thought is that the 30-45 min from adding sugar (high energy) until I cook the cakes should energize the yeast. I'm not sure if it's worked as I haven't repeated the process.
Yesterday, I had the opportunity to take my sister to Sam's Sourdough Cafe and I tried to eek their secret out of the waitress with the resulting comment of "it's complicated". Perhaps if I eat enough pancakes there, they will have sympathy. Then again I think I may have stumbled on the solution but I won't mention it until I've tried it.
Until next time.
Tuesday, September 25, 2012
The Pancake Saga Part VIII
This morning I made pancakes. Yes, I know it's the middle of the week but I had some extra time this morning so I did. I used the counter top starter which was smelling quite sourdoughy and I mixed all the ingredients and placed them in the already warm oven (my wife was drying lingonberries) while I took a shower.
After I got ready for the day, I started the skillet warming and put the first bit of batter in. Oops, I forgot the soda. So I made that pancake and then mixed in the salt and soda to the rest. Lo and behold the first pancake was very sourdoughy and, according to my wife, it was perhaps too sour. The remaining pancakes had barely any sour flavor.
Here's the question and my current presumption: The "sour" in sourdough is an acid which comes from the yeast. The baking soda is a base, which neutralizes the acid. Thus, if you add the right amount of soda it will completely neutralize the sour flavor. If you add too much, the pancakes become basic and chalky. By extension, I think I have learned that I need to do a long term chemical titration of sorts based on the sourness of the starter so I can develop an idea of exactly how much, if any, soda to add.
The challenge lies in the soda's necessity to make the pancakes fluffy. I need to minimize soda and maximize fluff. I may also try using baking powder instead of straight soda next time.
I think we've really made progress on this one.
Saturday, September 22, 2012
The Pancake Saga Part VII
In the last post I mentioned finding my starter pot in the RV last weekend and the potential of using it to start a new countertop starter. Well, I did it on Tuesday and by this morning it proved to be successful. The pot was definitely smelling sourdoughy.
This morning I took the countertop starter, pulled off what I needed, and made some flapjacks. My wife says they were the best I've done which is great but they're still not up to snuff for Sourdough Sam's. They had good sourdough flavor but weren't quite strong enough.
Next week I'll incubate it overnight in the oven with the light on and that should do the job. We'll see.
This morning I took the countertop starter, pulled off what I needed, and made some flapjacks. My wife says they were the best I've done which is great but they're still not up to snuff for Sourdough Sam's. They had good sourdough flavor but weren't quite strong enough.
Next week I'll incubate it overnight in the oven with the light on and that should do the job. We'll see.
Tuesday, September 18, 2012
The Pancake Saga Part VI
This is now a split decision. Over the Labor Day weekend we decided to pack up the RV and go camping in Valdez. The goal was to explore the area, get some good fall color viewing, and catch Silver Salmon (Coho). And of course, since I had four days off, I got to make three more attempts at the perfect sourdough pancake.
Unfortunately, none of my attempts seem to be improving lately. I've had six since my last post and yesterday we pulled the starter bowl out of the RV refrigerator where it had sat for two weeks and it has a strong distinctive sourdough smell. What does that mean? It means there's good yeast in there but I'm just not getting them to grow enough the way I'm managing the starter.
The concept is simple. If you use the starter, most likely you'll split it into two parts: One for the pancakes to grow overnight in the oven with a light on, and one to continue in the jar. When you do that you roughly half the number of yeast in the starter. Now, depending on how long the starter jar has had to grow, the yeast may still have plenty of food left so it's flour not yeast. If you use your starter too often and don't give it enough warm growing time (70-75 degrees F) then you will propagate a starter which never comes even close to running out of food and therefore isn't very strong.
I've been doing this for a couple of weeks now and I'm starting to think my solution is going to be a double feeding to really energize my yeast and get it active, then I may try to re-energize my base starter or to run two starters, one as insurance and one which I keep out at room temperature and give lots of energy.
I did discover with my pancakes over this last weekend that I could improve the taste of pancakes which are not fully sourdough by using the basic principles of buttermilk pancakes. These went over well with the kids and I may do it more often. In a nutshell, I used a slightly less watery starter and added soured milk (butter milk) and oatmeal to get the dough to the right consistency. All else remained the same and they were a much more flavorful pancake.
I think if I mix all of these components I may just come up with the perfect pancake: A sourdough buttermilk pancake.
Unfortunately, none of my attempts seem to be improving lately. I've had six since my last post and yesterday we pulled the starter bowl out of the RV refrigerator where it had sat for two weeks and it has a strong distinctive sourdough smell. What does that mean? It means there's good yeast in there but I'm just not getting them to grow enough the way I'm managing the starter.
The concept is simple. If you use the starter, most likely you'll split it into two parts: One for the pancakes to grow overnight in the oven with a light on, and one to continue in the jar. When you do that you roughly half the number of yeast in the starter. Now, depending on how long the starter jar has had to grow, the yeast may still have plenty of food left so it's flour not yeast. If you use your starter too often and don't give it enough warm growing time (70-75 degrees F) then you will propagate a starter which never comes even close to running out of food and therefore isn't very strong.
I've been doing this for a couple of weeks now and I'm starting to think my solution is going to be a double feeding to really energize my yeast and get it active, then I may try to re-energize my base starter or to run two starters, one as insurance and one which I keep out at room temperature and give lots of energy.
I did discover with my pancakes over this last weekend that I could improve the taste of pancakes which are not fully sourdough by using the basic principles of buttermilk pancakes. These went over well with the kids and I may do it more often. In a nutshell, I used a slightly less watery starter and added soured milk (butter milk) and oatmeal to get the dough to the right consistency. All else remained the same and they were a much more flavorful pancake.
I think if I mix all of these components I may just come up with the perfect pancake: A sourdough buttermilk pancake.
Saturday, September 8, 2012
The Harvest Continues
There are two different kinds of chokecherry trees. One kind has green leaves. The other kind has red leaves. Every tree in our yard has green leaves. Most of the ornamental trees around town in the parks and at businesses are the red-leafed variety. We picked some red-leafed chokecherries when we discovered them, after I had harvested all of our cherries. They were not as puckering and seemed to be a lot bigger than what I'd harvested. A side-by-side comparison shows a really dramatic difference between the two.
We knew they were bigger, but I didn't think they were that much bigger! After asking the parks department if I could pick them and getting a resounding yes, I got to work.
Not only were they seemingly more bountiful, but it took fewer chokecherries to fill my buckets. I quickly gathered about 2 gallons.
The problem with things this easy to find and this bountiful is that it becomes addictive to harvest them. It doesn't matter what fruit it is. In fact, I harvested more chokecherries yesterday afternoon.
Last night we finally had a hard frost. That means we're headed out to harvest low-bush cranberries/lingonberries this morning. I suspect, since our picking location is so plentiful, that we aren't going to stop until we've filled every container we take out there.
We knew they were bigger, but I didn't think they were that much bigger! After asking the parks department if I could pick them and getting a resounding yes, I got to work.
| The bounty of a red-leafed chokecherry. |
The problem with things this easy to find and this bountiful is that it becomes addictive to harvest them. It doesn't matter what fruit it is. In fact, I harvested more chokecherries yesterday afternoon.
Last night we finally had a hard frost. That means we're headed out to harvest low-bush cranberries/lingonberries this morning. I suspect, since our picking location is so plentiful, that we aren't going to stop until we've filled every container we take out there.
Tuesday, September 4, 2012
The Pancake Saga Part V
I don't know if I'll ever actually get caught up with this story but I promise I'll try.
This week I had a new challenge: We weren't even sure that the yeast was still alive! I'm not sure how it would have died, but for some reason even letting the sourdough rise overnight in the oven with the light on seemed not to make the starter smell sourdoughy nor was it all that bubbly.
What I realized is that only recently had I switched from bleached flour to unbleached. It seems the starter was doing its job but the more refined flour was more reactive to the yeast. On the other hand, according to everything I read, unbleached is better for the yeast and will produce better flavor. I'm also not sure that there was all that much yeast in my overnight starter as, only a day before, I took a cup out and gave it to a friend and fed the starter. I think I forgot to leave it out to get to room temperature so it seemed to not be all that "hot."
In any case, I made a very simple recipe consisting of:
2 cups starter (warmed over night)
2 tbsp sugar
1 tsp salt
1 egg
3 tsp oil
2 tbsp soda (baking soda)
The pancakes were light and fluffy! They rose just like they're supposed to when adding the soda and they had a pretty good sourdough flavor but they still seemed a little weak.
I'm getting closer.
This week I had a new challenge: We weren't even sure that the yeast was still alive! I'm not sure how it would have died, but for some reason even letting the sourdough rise overnight in the oven with the light on seemed not to make the starter smell sourdoughy nor was it all that bubbly.
What I realized is that only recently had I switched from bleached flour to unbleached. It seems the starter was doing its job but the more refined flour was more reactive to the yeast. On the other hand, according to everything I read, unbleached is better for the yeast and will produce better flavor. I'm also not sure that there was all that much yeast in my overnight starter as, only a day before, I took a cup out and gave it to a friend and fed the starter. I think I forgot to leave it out to get to room temperature so it seemed to not be all that "hot."
In any case, I made a very simple recipe consisting of:
2 cups starter (warmed over night)
2 tbsp sugar
1 tsp salt
1 egg
3 tsp oil
2 tbsp soda (baking soda)
The pancakes were light and fluffy! They rose just like they're supposed to when adding the soda and they had a pretty good sourdough flavor but they still seemed a little weak.
I'm getting closer.
Saturday, September 1, 2012
Winemaking 101: Chapter 3
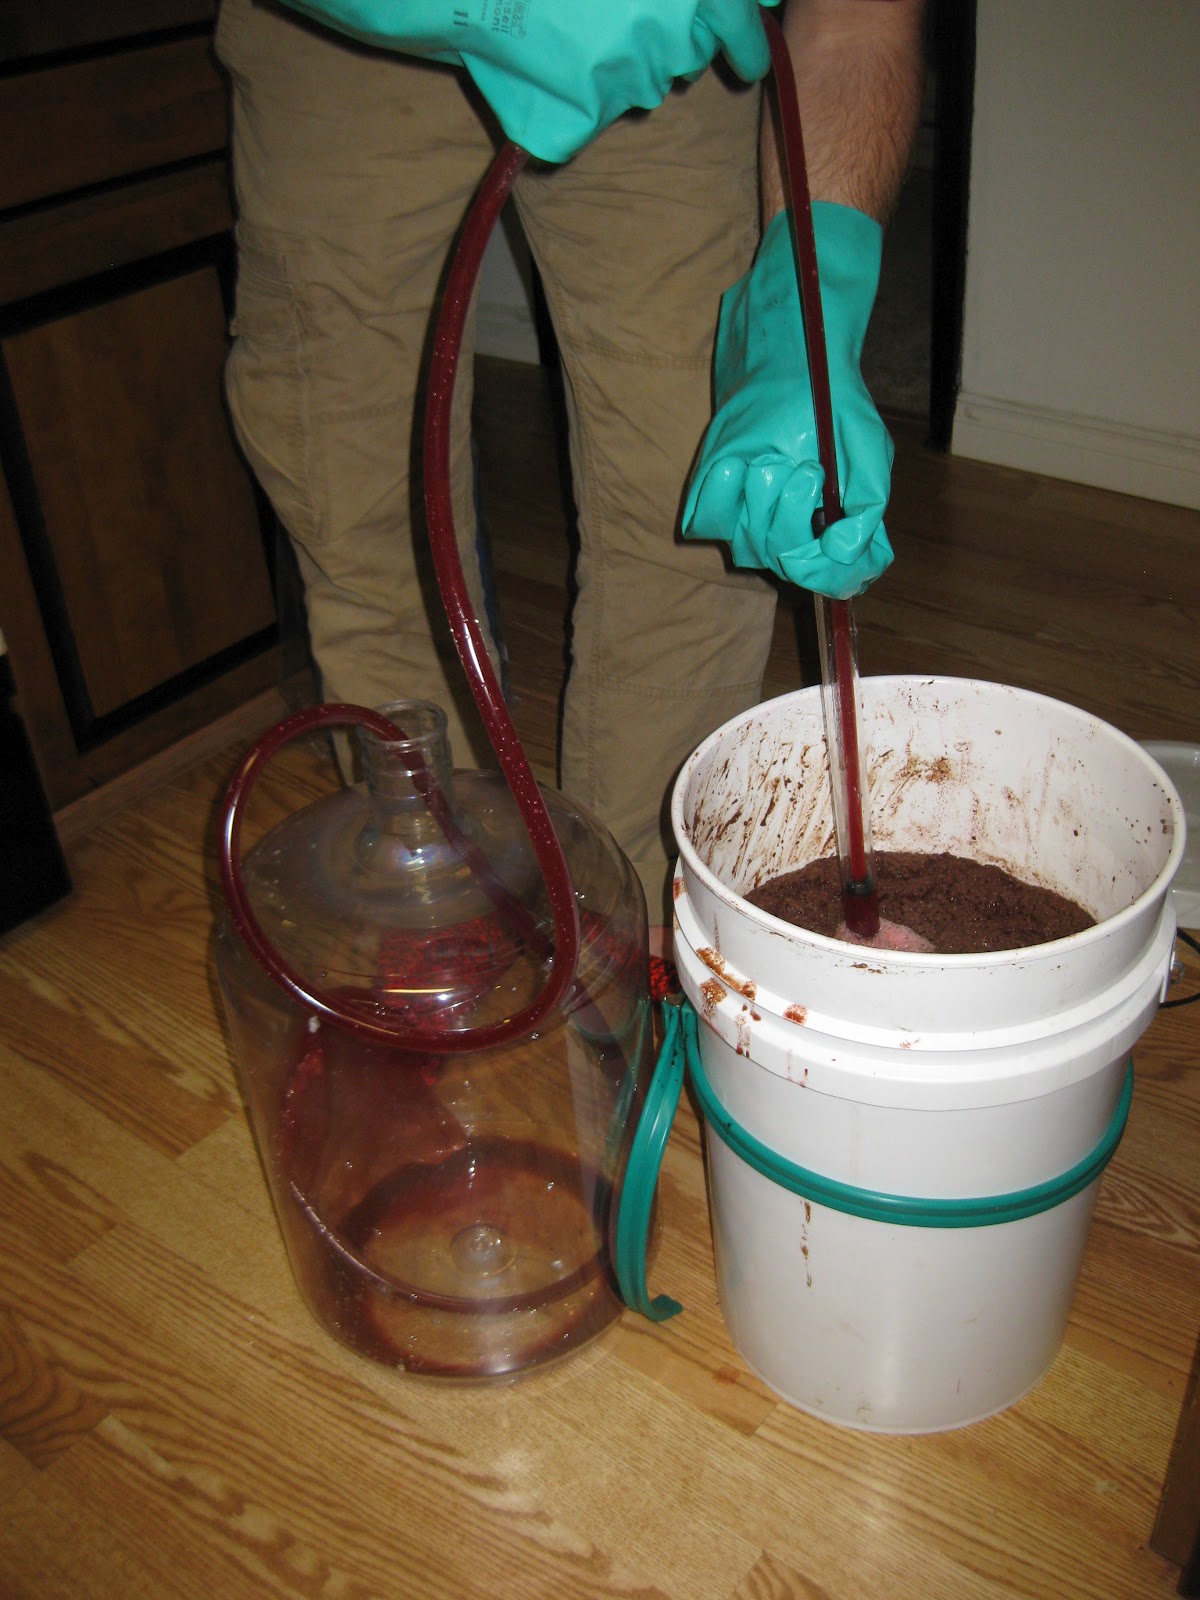
After a week of our house smelling like yeast, we acquired a 5-gallon carboy and auto-siphon to transfer the wine for secondary fermentation. Taking the cover off the top of the bucket revealed something that looked like sediment on top of the wine.
This was something we were not prepared for and I almost wished we were doing it in the garage. As my husband squeezed and rung it out, we got some sprays of juice on the cupboards, floor, and ourselves! (Yes, those gloves look serious and they are serious gloves, but he works in the medical field, so it's what we had to keep both his hands clean and the wine from being contaminated by his hands.) Once that was done, we decided to let the sediment settle again before siphoning.
The auto-siphon is a beautiful thing and not much more expensive than a regular siphon that you have to suck on to get started. Not only is it easier because it's just a pump, but it keeps things as sterile as possible. As we were transferring the wine, we both couldn't stop marveling at what a nice color it had. They say to take as much of the liquid as possible, even if it means you're taking sediment with it.
The glass on the left tasted more like very sweet rotten fruit than wine. The glass on the right tasted much, much less like rotten fruit, but it still definitely has a long way to go! We're looking forward to tasting the next stage in about a month, though it will still have aging to do after that, too.
First things first, you have to pull the bag of fruit out and try to squeeze out as much of the liquid as possible.
This was something we were not prepared for and I almost wished we were doing it in the garage. As my husband squeezed and rung it out, we got some sprays of juice on the cupboards, floor, and ourselves! (Yes, those gloves look serious and they are serious gloves, but he works in the medical field, so it's what we had to keep both his hands clean and the wine from being contaminated by his hands.) Once that was done, we decided to let the sediment settle again before siphoning.
| Just after this, we put the bucket on a chair. |
| Such a pretty color! |
| More Fox Spring water, of course. |
As you can see, the next step is to fill the rest of the carboy with water because we took out a large bag of fruit, so this is how to get five gallons of wine. Finally, you have to close it with an airlock, which gets filled with water, so that the wine stays in an anaerobic environment during secondary fermentation, allowing air to escape but not enter. We then moved it down into the basement and put the warming belt on it. It will stay there for 4-6 weeks.
Of course, we couldn't do this without sampling a little of the product so far. We poured two glasses: one straight from the siphon and one from the drippings of the bag of fermented fruit.
![]() |
| From the siphon. |
![]() |
| From the fermentation bag. |
Tuesday, August 28, 2012
Bunchberries: Useful or Useless?
The research we had done on bunchberries showed only that they have a very high amount of natural pectin and very little water and taste of their own. We found a small handful of recipes, mostly for raspberry bunchberry syrup and not much else.
However, we didn't want to just take everyone else's word for it, so we took a small amount of berries and cooked them down.
For something so bright red and sometimes almost orange, this was not quite the color we were expecting. Also, they really do have very little flavor of their own. My husband added some honey to it, but all that really did was make it taste like honey.
After this confirmation, we have been trying to decide what to do with the gallons of bunchberries we still have sitting in our garage. We know they're good to use as natural pectin in jams and jellies as they carry the flavors of other fruits well--because they don't have their own flavor to speak of.
To try to find more about using them as pectin, I found this blog, Bunchberry Farm. Jasmine has helped give me a little guidance as to how to use them as pectin, but mostly we'll be guessing and checking. Our biggest problem right now is the lack of all our handy dandy kitchen gadgets to assist with extracting seeds and crushing them up. As you can see in the picture, they actually hold their form fairly well.
We're still trying to decided, since we are very short on freezer storage space, whether to keep what we harvested or not. I really hate to throw away something that is not totally useless and that we spent 45 minutes out in the cold rain gathering, but we might since they aren't exceptionally useful and we are so low on space right now.
The most useful thing that came out of harvesting all these bunchberries? When we first found them last weekend, we were on a hunt for crowberries to harvest. What we realized very quickly as we started raking in the bunchberries this Saturday was that they were entirely surrounded by blueberries--lots and lots of blueberries! Now, right now is not a good time for blueberries, so the plants were not very fruitful. However, there were many plants that both of us saw that still had quite a few blueberries still hanging on, meaning they had not been picked clean by someone.
In short, thanks to going back for the bunchberries caused us to realize that we had found our blueberry patch for next year. That made it all worth it. And it is most definitely staying an undisclosed location!
However, we didn't want to just take everyone else's word for it, so we took a small amount of berries and cooked them down.
For something so bright red and sometimes almost orange, this was not quite the color we were expecting. Also, they really do have very little flavor of their own. My husband added some honey to it, but all that really did was make it taste like honey.
After this confirmation, we have been trying to decide what to do with the gallons of bunchberries we still have sitting in our garage. We know they're good to use as natural pectin in jams and jellies as they carry the flavors of other fruits well--because they don't have their own flavor to speak of.
To try to find more about using them as pectin, I found this blog, Bunchberry Farm. Jasmine has helped give me a little guidance as to how to use them as pectin, but mostly we'll be guessing and checking. Our biggest problem right now is the lack of all our handy dandy kitchen gadgets to assist with extracting seeds and crushing them up. As you can see in the picture, they actually hold their form fairly well.
We're still trying to decided, since we are very short on freezer storage space, whether to keep what we harvested or not. I really hate to throw away something that is not totally useless and that we spent 45 minutes out in the cold rain gathering, but we might since they aren't exceptionally useful and we are so low on space right now.
The most useful thing that came out of harvesting all these bunchberries? When we first found them last weekend, we were on a hunt for crowberries to harvest. What we realized very quickly as we started raking in the bunchberries this Saturday was that they were entirely surrounded by blueberries--lots and lots of blueberries! Now, right now is not a good time for blueberries, so the plants were not very fruitful. However, there were many plants that both of us saw that still had quite a few blueberries still hanging on, meaning they had not been picked clean by someone.
In short, thanks to going back for the bunchberries caused us to realize that we had found our blueberry patch for next year. That made it all worth it. And it is most definitely staying an undisclosed location!
Monday, August 27, 2012
Winemaking 101: Chapter 2
Last weekend when we went to start our chokecherry wine, we realized that the recipes I'd been looking at were for one gallon. We wanted to make five gallons. This was not a huge deal once we found a five gallon recipe, but it did mean that we had to buy a lot more sugar and use ALL of the chokecherries in our freezer plus another two pounds that my husband had to pick before we could get started. Added to the delay was the fact that over half a gallon of the cherries in our freezer had not yet had the stems removed.
Here's a quick tip for stemming chokecherries: If you can do it when you clean them, by all means, take the time to do so. If not, the easiest way is to freeze them then pull small amounts out of the freezer at a time (so they don't thaw) and they are much easier to stem because the skins don't slip off and make a sticky mess all over your hands. Keep a wet washcloth handy to wipe off any stickiness that will get on your hands anyway, though.
So we finally got to the point of crushing up the fruit to start the primary fermentation process. Since over half the chokecherries were frozen when we started all of this, my poor husband's hands nearly froze off as he tried to crush up all the cherries.
Once we felt they were sufficiently crushed, they went into a mesh bag inside a five gallon bucket with a mixture of water, sugar, yeast energizer, pectic enzyme, crushed campden tablets, and acid blend.
We actually keep our house cool enough (and I don't mean through air conditioning!), though, that we had to get a warming belt because, even in our kitchen, room temperature is about 65 degrees. Fermentation is best between 70 and 75 degrees. No way were we going to increase our heating bills just for the wine. Besides, we plan to make more in the basement where it really doesn't get into the 70s!
Here's a quick tip for stemming chokecherries: If you can do it when you clean them, by all means, take the time to do so. If not, the easiest way is to freeze them then pull small amounts out of the freezer at a time (so they don't thaw) and they are much easier to stem because the skins don't slip off and make a sticky mess all over your hands. Keep a wet washcloth handy to wipe off any stickiness that will get on your hands anyway, though.
So we finally got to the point of crushing up the fruit to start the primary fermentation process. Since over half the chokecherries were frozen when we started all of this, my poor husband's hands nearly froze off as he tried to crush up all the cherries.
| Chokecherries actually become a very beautiful color when processed. |
Finally, you fill the rest of the bucket with water to the 5 gallon mark and cover it with a light-weight cloth so that it can breathe. Wait 24 hours then add a packet of wine yeast onto the top of it--no stirring. Cover it with the cloth again and wait a week.
Winemaking 101: Chapter 1
We have been talking about making our own wine for almost 3 years. Both of our grandfathers, at varying points in their lives, made homemade wine. For various reasons--mainly moving around--we have not been able to start that project. Upon moving into our house here, we determined that we were finally going to make wine. Then came the question of what to make. We both love mead and have talked about making our own almost as long as we've talked about making wine.
Since we still have two mortgages (that and we're just cheap), we decided to attempt this as frugally as possible. As much as we'd like to make mead, honey is really very expensive. So to start, we thought we could use a fruit that we know is used to make wine and is free, abundant, and readily accessible in our own yard. I'm sure you can guess where this is going. That's right: chokecherry wine!
So we bought the bare minimum of what we needed just to start. When we were up in Fox, AK, for the Permafrost Tunnel tour, we brought our 5-gallon water jug to fill with water at the natural spring to use that water for our wine. Silver Gulch Brewing & Bottling Company, located in Fox, uses the spring water to brew all their beer. As I said in a previous post, we hauled drinking water from this spring for an entire month when we lived halfway between Fairbanks and Fox. Countless people in the area use this spring water for drinking and cooking, including people from all the way down in North Pole, AK.
So last Saturday night we finally got to the business of starting our first five gallons of wine, with plenty of delays and false starts!
Since we still have two mortgages (that and we're just cheap), we decided to attempt this as frugally as possible. As much as we'd like to make mead, honey is really very expensive. So to start, we thought we could use a fruit that we know is used to make wine and is free, abundant, and readily accessible in our own yard. I'm sure you can guess where this is going. That's right: chokecherry wine!
So we bought the bare minimum of what we needed just to start. When we were up in Fox, AK, for the Permafrost Tunnel tour, we brought our 5-gallon water jug to fill with water at the natural spring to use that water for our wine. Silver Gulch Brewing & Bottling Company, located in Fox, uses the spring water to brew all their beer. As I said in a previous post, we hauled drinking water from this spring for an entire month when we lived halfway between Fairbanks and Fox. Countless people in the area use this spring water for drinking and cooking, including people from all the way down in North Pole, AK.
| Our daughter loves to help get "Fox water." |
| Fillin' her up. Yes, we had completely sterilized the bottle. |
Sunday, August 26, 2012
Bunches and Bunches of Berries
Last weekend when we were out scouting good berry locations in the area, we found these very plentiful berries but we had no idea if they were edible or not.
After asking a few people whether they knew what they were and whether they were edible, I went searching online and quickly found that they are--surprise, surprise--bunchberries! The plant is commonly known as a dwarf dogwood. The berries are edible but there is not a lot of information out there about how to use them.
Once we knew this and where to gather gallons of them quickly, we planned to revisit this location and pick a whole bunch. What better time to go pick them than a cold, rainy day like today? With two berry rakes and lots of containers, we managed to harvest several gallons in around an hour.
Due to the rain and all the leaves we raked up with them, I decided it would be easier to lay them all out to dry before trying to get the chaff out, which is best done with most berries by rolling them down a dry towel-covered board.
The next question is: what do we do with all these berries now?
While we wait for the berries to dry, enjoy one of our lovely views from today:
| Undisclosed berry-picking location |
Saturday, August 25, 2012
The Pancake Part IV
I am almost caught up with the sourdough pancake saga. This is the story of iteration five, week 4 of the pancake saga, which was last Saturday. That day I scrapped the recipe which came with our starter and took up Steve Floyd's method. This time I started the starter at about noon on Friday but never put it in a very warm place. I will now digress.
We tend to keep the room temperature at 60-65 degrees inside. This is due to the annual number of heating degree days (HDD) which Fairbanks is subject to. The annual HDD for Fairbanks is around 14,000. Now compare that to a place which still gets winter but is more mild like Central Illinois, which is around 6,400. Basically, we never get to shut off the furnace as even in the summertime it only rarely gets up to a temperature where it stays at or above "room temperature" during the day much less overnight. With heating oil being around $3.80 a gallon, that comes out to an average of $400-600 a month to keep the house hospitable. Some of our neighbors changed over to natural gas or use electric and their bills can be as high as $1-2K per month in the winter.
Now back to the pancake. The starter stayed out at our room temperature for almost 18 hours. But yeast is most active from 70-75 degrees Fahrenheit. Thus, my pancake batter grew but it would probably have taken 48 hours to get really going to where the flapjacks would taste sourdoughy.
I can't go back or postpone breakfast so no matter what happens, I make the pancakes. This time they stuck together correctly, were somewhat glutinous and I cooked them in a cast iron skillet so they got brown (until my daughter started bugging me to start her plate as she was sooo hungry and then I lost track of the skillet and a couple got slightly crispy). I think I'm on the right track but I haven't gotten it yet.
We tend to keep the room temperature at 60-65 degrees inside. This is due to the annual number of heating degree days (HDD) which Fairbanks is subject to. The annual HDD for Fairbanks is around 14,000. Now compare that to a place which still gets winter but is more mild like Central Illinois, which is around 6,400. Basically, we never get to shut off the furnace as even in the summertime it only rarely gets up to a temperature where it stays at or above "room temperature" during the day much less overnight. With heating oil being around $3.80 a gallon, that comes out to an average of $400-600 a month to keep the house hospitable. Some of our neighbors changed over to natural gas or use electric and their bills can be as high as $1-2K per month in the winter.
Now back to the pancake. The starter stayed out at our room temperature for almost 18 hours. But yeast is most active from 70-75 degrees Fahrenheit. Thus, my pancake batter grew but it would probably have taken 48 hours to get really going to where the flapjacks would taste sourdoughy.
I can't go back or postpone breakfast so no matter what happens, I make the pancakes. This time they stuck together correctly, were somewhat glutinous and I cooked them in a cast iron skillet so they got brown (until my daughter started bugging me to start her plate as she was sooo hungry and then I lost track of the skillet and a couple got slightly crispy). I think I'm on the right track but I haven't gotten it yet.
Labels:
AK,
Alaska,
central Illinois,
cost of heating in alaska,
Fairbanks,
HDD,
Heating degree days,
heating in alaska,
heating oil,
heating oil cost,
illinois,
pancake,
sour dough,
Sourdough,
sourdough pancake,
yeast
The Pancake Part III
My 4th try was on the 11th of August in the year of our Lord 2012. My wife bought the ingredients so I could make the pancakes exactly as the recipe on the back of the info card says. It recommends mixing the starter with Krutzeaz pancake mix and letting it grow overnight. Then add all the rest of the ingredients in the morning. According to one of my wife's friends, Steve Floyd (a radio host on 660 KFAR and host of The Better Breakfast Show which I listen to every morning) when you add the baking soda or "soda," the mix is supposed to almost double in size before your eyes. Obviously, I did something wrong as mine stayed flat.
That morning I tried using our great new George Foreman G5 griddle. So I mixed it all up and poured some on the griddle. The first two pancakes came out great, but for some reason not very sourdoughy. The second round just wouldn't cook and get brown. It was taking about 5 min for each set of pancakes. This happens when the griddle cools from the new batter and there isn't enough latent heat in the plates to keep it cooking. I still made all of the pancakes on the griddle but they were mostly white and, yet again, not very sourdoughy.
In fact, that morning the cool griddle was the least of my problems. They also kept falling apart and just didn't taste right. I believe I used some expletives about that method and the frustration I had with the poorly written recipe from the Kiwanis who gave us the starter. At this time I vowed not to use that recipe again and have focused on Steve's recipe instead, which he graciously shared with us.
Now, since I'm frustrated just writing about that morning, I will post a serene Alaska video for all to enjoy.
That morning I tried using our great new George Foreman G5 griddle. So I mixed it all up and poured some on the griddle. The first two pancakes came out great, but for some reason not very sourdoughy. The second round just wouldn't cook and get brown. It was taking about 5 min for each set of pancakes. This happens when the griddle cools from the new batter and there isn't enough latent heat in the plates to keep it cooking. I still made all of the pancakes on the griddle but they were mostly white and, yet again, not very sourdoughy.
In fact, that morning the cool griddle was the least of my problems. They also kept falling apart and just didn't taste right. I believe I used some expletives about that method and the frustration I had with the poorly written recipe from the Kiwanis who gave us the starter. At this time I vowed not to use that recipe again and have focused on Steve's recipe instead, which he graciously shared with us.
Now, since I'm frustrated just writing about that morning, I will post a serene Alaska video for all to enjoy.
Alaskan Medevac coming in for a landing in the Tanana Flats south of North Pole, AK.
Chokecherry Jam Update
So as what was supposed to be chokecherry jam cooled last night, we realized that it wasn't really solidifying that well. As such, we now have four pints of chokecherry syrup, one of which is opened and was used on my husband's latest attempt of sourdough pancakes this morning. It is excellent syrup. I will let him keep you updated on the pancakes.
Journey to the Center of...30,000-Year-Old Ice
Permafrost--perennially frozen ground--is a fact of life up here. It affects everyone in some way from building foundations to roads heaving to having ice cold water straight out of the tap (that last one I really like!). Engineers in this part of the world have been battling the effects of permafrost (especially when it melts due to, say, a road bed laid over top of it) and trying to understand permafrost for as long as people have been building here.
This sign is located on the Steese Highway just south of the small town of Fox, AK, almost 10 miles north of Fairbanks. For a month earlier this year we hauled drinking water from a natural spring in Fox, so we saw this sign quite a few times. Every time we passed it, I thought to myself and often said aloud to my husband that I would love to see that. This Permafrost Tunnel Research Facility is a joint facility between the US Army Corps of Engineers and the University of Alaska-Fairbanks.
This past Saturday and Sunday, they held their first open house ever in their almost 50 years of existence. Of course, we jumped at the chance to tour this tunnel. They apparently were not sure how many people would show up for it. They were overwhelmed by the outpouring of interest from the community and tourists. I don't know the stats for Sunday, but they had to turn away at least 250 people on Saturday because they could only take about 475 people through the tunnel on their scheduled tours. Apparently, if we had arrived much later than we did (about half an hour after they opened), we would have been turned away as well. Fortunately, however, we both got to tour the tunnel and it was well worth the wait we had.
They actually cool the tunnel down to 24 degrees to prevent any of it from thawing. Normally permafrost is just a few degrees below freezing.
| Ice wedge |
![]() |
| Junction of that ice wedge with other wedges |
| Striation in the ice wedge. These wedges are predicted to be 30,000 years old, but have stopped growing. |
| Close-up of the ice surface. |
We really feel so blessed to have had the opportunity to see something so rarely seen by the public and, as part of their purpose in this open house was to gauge public interest, I really hope they do it again sometime and even work toward having regular public tours.
Subscribe to:
Posts (Atom)