Tuesday, September 25, 2012

The Pancake Saga Part VIII

This morning I made pancakes.  Yes, I know it's the middle of the week but I had some extra time this morning so I did.  I used the counter top starter which was smelling quite sourdoughy and I mixed all the ingredients and placed them in the already warm oven (my wife was drying lingonberries) while I took a shower.

After I got ready for the day, I started the skillet warming and put the first bit of batter in.  Oops, I forgot the soda.  So I made that pancake and then mixed in the salt and soda to the rest.  Lo and behold the first pancake was very sourdoughy and, according to my wife, it was perhaps too sour.  The remaining pancakes had barely any sour flavor.

Here's the question and my current presumption: The "sour" in sourdough is an acid which comes from the yeast.  The baking soda is a base, which neutralizes the acid.  Thus, if you add the right amount of soda it will completely neutralize the sour flavor.  If you add too much, the pancakes become basic and chalky.  By extension, I think I have learned that I need to do a long term chemical titration of sorts based on the sourness of the starter so I can develop an idea of exactly how much, if any, soda to add.

The challenge lies in the soda's necessity to make the pancakes fluffy.  I need to minimize soda and maximize fluff.  I may also try using baking powder instead of straight soda next time.

I think we've really made progress on this one.

Saturday, September 22, 2012

The Pancake Saga Part VII

In the last post I mentioned finding my starter pot in the RV last weekend and the potential of using it to start a new countertop starter.  Well, I did it on Tuesday and by this morning it proved to be successful.  The pot was definitely smelling sourdoughy.

This morning I took the countertop starter, pulled off what I needed, and made some flapjacks.  My wife says they were the best I've done which is great but they're still not up to snuff for Sourdough Sam's.  They had good sourdough flavor but weren't quite strong enough.

Next week I'll incubate it overnight in the oven with the light on and that should do the job.  We'll see.

Tuesday, September 18, 2012

The Pancake Saga Part VI

This is now a split decision.  Over the Labor Day weekend we decided to pack up the RV and go camping in Valdez.  The goal was to explore the area, get some good fall color viewing, and catch Silver Salmon (Coho).  And of course, since I had four days off, I got to make three more attempts at the perfect sourdough pancake.

Unfortunately, none of my attempts seem to be improving lately.  I've had six since my last post and  yesterday we pulled the starter bowl out of the RV refrigerator where it had sat for two weeks and it has a strong distinctive sourdough smell.  What does that mean?  It means there's good yeast in there but I'm just not getting them to grow enough the way I'm managing the starter.

The concept is simple.  If you use the starter, most likely you'll split it into two parts: One for the pancakes to grow overnight in the oven with a light on, and one to continue in the jar.  When you do that you roughly half the number of yeast in the starter.  Now, depending on how long the starter jar has had to grow, the yeast may still have plenty of food left so it's flour not yeast.  If you use your starter too often and don't give it enough warm growing time (70-75 degrees F) then you will propagate a starter which never comes even close to running out of food and therefore isn't very strong.

I've been doing this for a couple of weeks now and I'm starting to think my solution is going to be a double feeding to really energize my yeast and get it active, then I may try to re-energize my base starter or to run two starters, one as insurance and one which I keep out at room temperature and give lots of energy.

I did discover with my pancakes over this last weekend that I could improve the taste of pancakes which are not fully sourdough by using the basic principles of buttermilk pancakes.  These went over well with the kids and I may do it more often.  In a nutshell, I used a slightly less watery starter and added soured milk (butter milk) and oatmeal to get the dough to the right consistency.  All else remained the same and they were a much more flavorful pancake.

I think if I mix all of these components I may just come up with the perfect pancake: A sourdough buttermilk pancake.

Saturday, September 8, 2012

The Harvest Continues

There are two different kinds of chokecherry trees.  One kind has green leaves.  The other kind has red leaves.  Every tree in our yard has green leaves.  Most of the ornamental trees around town in the parks and at businesses are the red-leafed variety.  We picked some red-leafed chokecherries when we discovered them, after I had harvested all of our cherries.  They were not as puckering and seemed to be a lot bigger than what I'd harvested.  A side-by-side comparison shows a really dramatic difference between the two.


We knew they were bigger, but I didn't think they were that much bigger!  After asking the parks department if I could pick them and getting a resounding yes, I got to work.

The bounty of a red-leafed chokecherry.
Not only were they seemingly more bountiful, but it took fewer chokecherries to fill my buckets.  I quickly gathered about 2 gallons.

The problem with things this easy to find and this bountiful is that it becomes addictive to harvest them.  It doesn't matter what fruit it is.  In fact, I harvested more chokecherries yesterday afternoon.

Last night we finally had a hard frost.  That means we're headed out to harvest low-bush cranberries/lingonberries this morning.  I suspect, since our picking location is so plentiful, that we aren't going to stop until we've filled every container we take out there.

Tuesday, September 4, 2012

The Pancake Saga Part V

I don't know if I'll ever actually get caught up with this story but I promise I'll try.

This week I had a new challenge: We weren't even sure that the yeast was still alive!  I'm not sure how it would have died, but for some reason even letting the sourdough rise overnight in the oven with the light on seemed not to make the starter smell sourdoughy nor was it all that bubbly.

What I realized is that only recently had I switched from bleached flour to unbleached.  It seems the starter was doing its job but the more refined flour was more reactive to the yeast.  On the other hand, according to everything I read, unbleached is better for the yeast and will produce better flavor.  I'm also not sure that there was all that much yeast in my overnight starter as, only a day before, I took a cup out and gave it to a friend and fed the starter.  I think I forgot to leave it out to get to room temperature so it seemed to not be all that "hot."

In any case, I made a very simple recipe consisting of:
2 cups starter (warmed over night)
2 tbsp sugar
1 tsp salt
1 egg
3 tsp oil
2 tbsp soda (baking soda)

The pancakes were light and fluffy!  They rose just like they're supposed to when adding the soda and they had a pretty good sourdough flavor but they still seemed a little weak.

I'm getting closer.

Saturday, September 1, 2012

Winemaking 101: Chapter 3

After a week of our house smelling like yeast, we acquired a 5-gallon carboy and auto-siphon to transfer the wine for secondary fermentation.  Taking the cover off the top of the bucket revealed something that looked like sediment on top of the wine.


First things first, you have to pull the bag of fruit out and try to squeeze out as much of the liquid as possible.


This was something we were not prepared for and I almost wished we were doing it in the garage.  As my husband squeezed and rung it out, we got some sprays of juice on the cupboards, floor, and ourselves!  (Yes, those gloves look serious and they are serious gloves, but he works in the medical field, so it's what we had to keep both his hands clean and the wine from being contaminated by his hands.) Once that was done, we decided to let the sediment settle again before siphoning.

Just after this, we put the bucket on a chair.
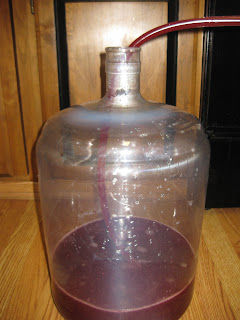
Such a pretty color!
The auto-siphon is a beautiful thing and not much more expensive than a regular siphon that you have to suck on to get started.  Not only is it easier because it's just a pump, but it keeps things as sterile as possible.  As we were transferring the wine, we both couldn't stop marveling at what a nice color it had.  They say to take as much of the liquid as possible, even if it means you're taking sediment with it.

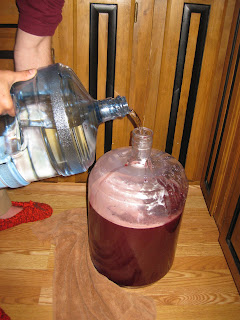
More Fox Spring water, of course.


As you can see, the next step is to fill the rest of the carboy with water because we took out a large bag of fruit, so this is how to get five gallons of wine.  Finally, you have to close it with an airlock, which gets filled with water, so that the wine stays in an anaerobic environment during secondary fermentation, allowing air to escape but not enter.  We then moved it down into the basement and put the warming belt on it.  It will stay there for 4-6 weeks.  

Of course, we couldn't do this without sampling a little of the product so far.  We poured two glasses: one straight from the siphon and one from the drippings of the bag of fermented fruit.

From the siphon.
From the fermentation bag.
The glass on the left tasted more like very sweet rotten fruit than wine.  The glass on the right tasted much, much less like rotten fruit, but it still definitely has a long way to go!  We're looking forward to tasting the next stage in about a month, though it will still have aging to do after that, too.